


Ready to launch your website?
Fast, secure hosting with free SSL and real human support.
Table of Contents
- 1. Cloudflare CDN and Why Do You Need It?
- 2. Create a Cloudflare Account
- 3. Add Your Website to Cloudflare
- 4. Review and Verify your DNS Records
- 5. Choose Your Cloudflare Plan
- 6. Update Nameservers at Your Domain Registrar
- 7. Verify Nameserver Change in Cloudflare
- 8. Configure Basic Cloudflare Settings
- 9. Add Page Rules
- 10. Make Minor Changes on Your Website
- 11. Test Your Cloudflare CDN Installation
- 12. Troubleshooting Common Problems
- 13. Final Checks
- 14. Steps After Setup
- 15. Conclusion
Cloudflare CDN and Why Do You Need It?
Cloudflare CDN (Content Delivery Network) speeds up your website by storing copies of your pages and files (image, styling, font, website function javascript files) in your database on servers around the world.
When someone visits your site, CDNs get data from the nearest server to your location ( new york server or mumbai server), making your website load faster, reducing bandwidth costs, and blocking attacks before they reach your hosting server.
Benefits you’ll get:
-
30-50% faster page loads
-
Free DDoS protection & web firewall
-
Free shared SSL certificate
Requirements:
-
A live website with a domain name (yourdomain.com)
-
Access to your domain registrar account (Sowfihost, GoDaddy etc.)
-
Your hosting provider’s nameservers or DNS records
Create a Cloudflare Account
-
Go to cloudflare.com and click Sign Up.
-
Enter your email address and choose a password.
-
Click Create Account and verify your email address.
-
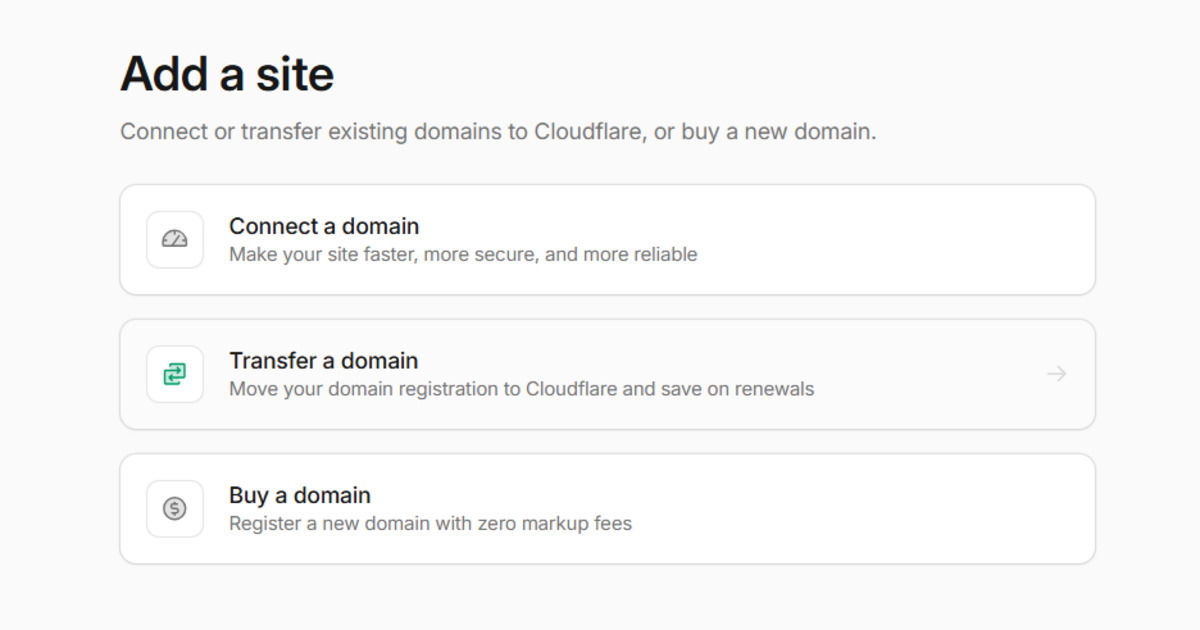
After login, you’ll see the dashboard. Click Add a Site.
Add Your Website to Cloudflare
-
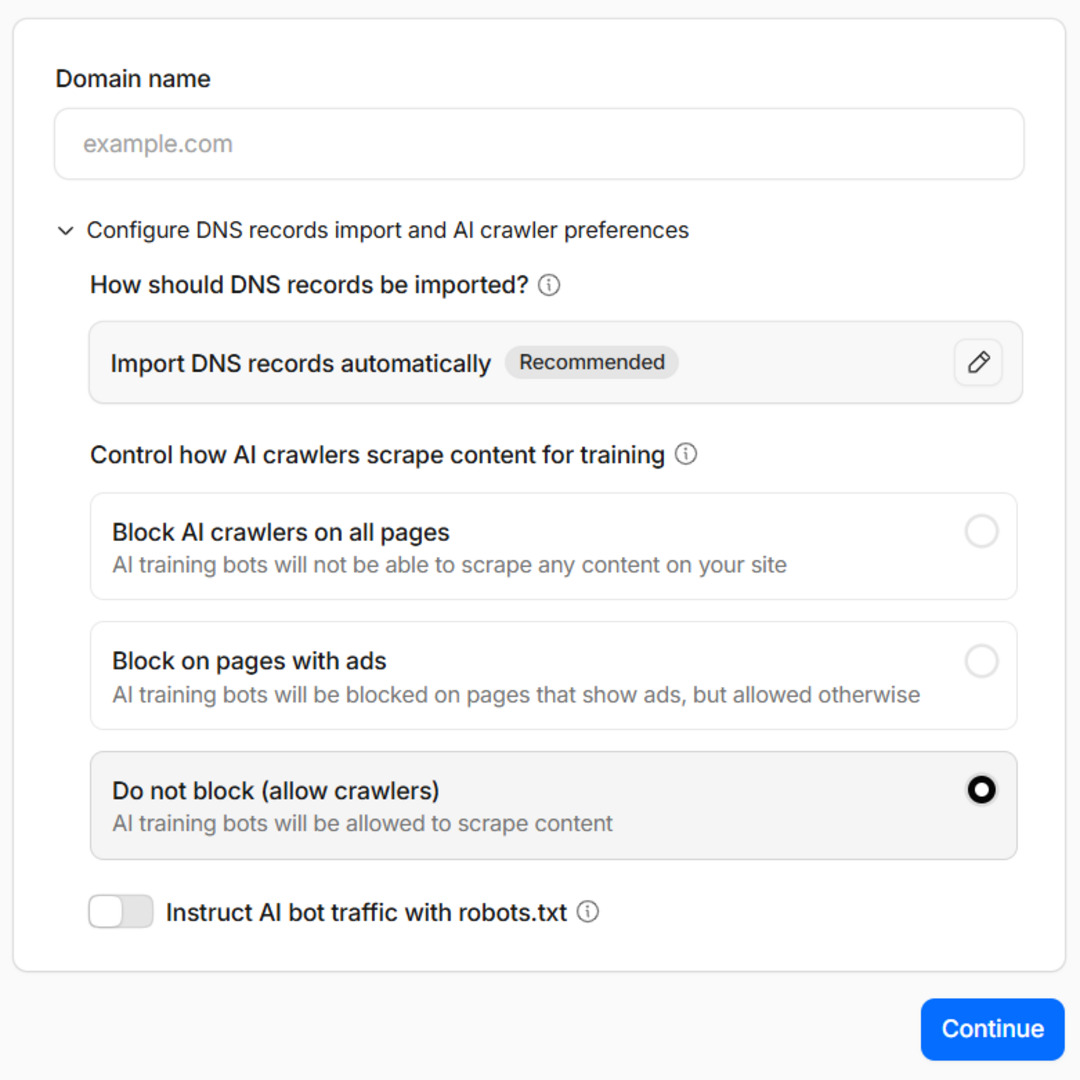
Click Connect a domain and type your full domain name (yourwebsite.com - without www or https://) in the text field
-
Select “Import DNS records automatically” option in Configure DNS records section
-
If you want to block all AI bots from finding your website content like Deepseek, Gemini, ChatGPT, Claude, Grok Crawlers you can select the Block option but it is recommended to select “Do not block (allow crawlers)” to get your content mentioned on AI Search Engines
-
Click Continue and select a plan that suits your needs or select Free plan.
-
Cloudflare will automatically scan your existing DNS records. This takes 10-30 seconds.
Review and Verify your DNS Records
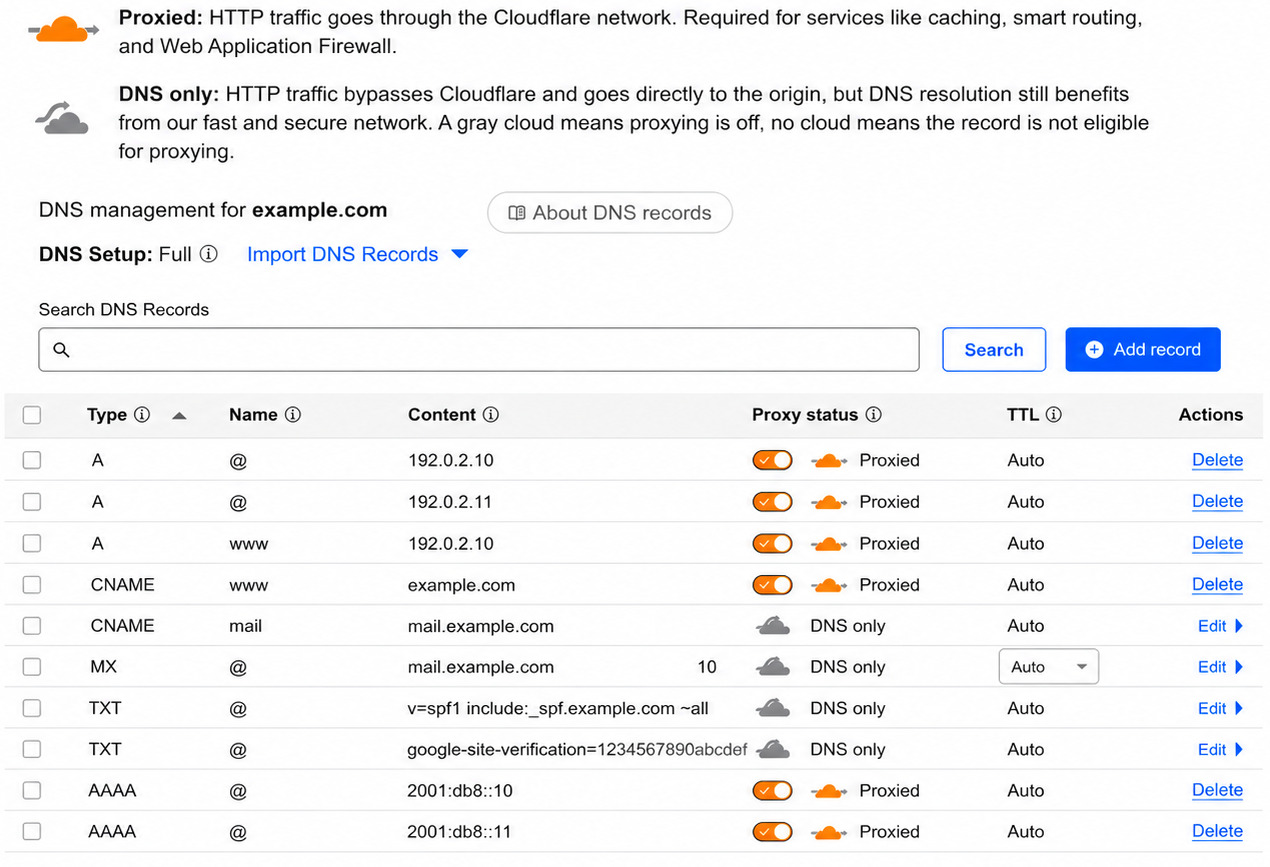
Cloudflare shows a list of DNS records it found. You must ensure every record is correct - otherwise your website, email, or subdomains may break.
What to check for a typical website:
|
Record Type |
Name/Host |
Content/Target |
Proxy Status (Orange Cloud) |
|
A |
@ (yourdomain.com) |
Your hosting IP address |
Orange (Proxied) |
|
A |
www |
Your hosting IP address |
Orange (Proxied) |
|
CNAME |
mail or email |
Your email provider (e.g., mail.yourhost.com) |
Gray (DNS only) |
|
MX |
@ |
Your mail server (e.g., mail.yourdomain.com) |
Gray (DNS only) |
If you don’t see all your records, click Add Record to manually add missing ones. For email, never proxy MX or TXT records, leave them gray.
When you turn on the orange cloud, Cloudflare acts as an intermediary, known as a reverse proxy.
-
Orange cloud (Proxied) → Traffic goes through Cloudflare CDN (for web traffic).
-
Gray cloud (DNS only) → Bypasses CDN (for email, FTP, subdomains that need real visitor IPs).
Cloudflare stores copies of your website's HTML, images, CSS, and JavaScript Files at Cloudflare's data centres worldwide.
When someone searches your website URL or domain on their browser, Cloudflare provides its own Anycast IP address.
It serves your website files from the nearest geographical server to the user by establishing a secure TLS/SSL connection directly with the nearest Cloudflare data centre
Once everything looks correct, click Continue.
Choose Your Cloudflare Plan
-
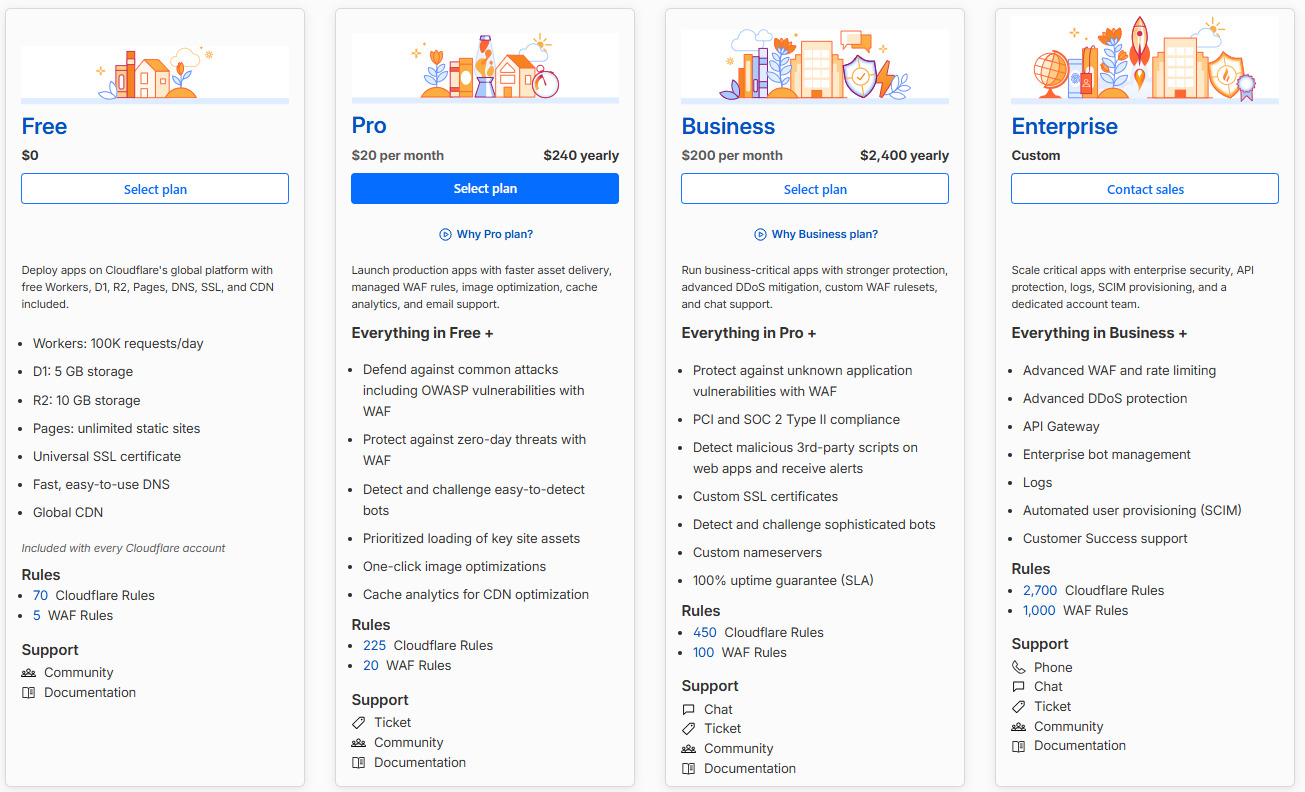
Free: Recommended for most small to medium websites. Includes CDN, SSL, basic DDoS.
-
Pro: Adds image optimization, Web Application Firewall (WAF) rules.
-
Business: For high-traffic sites.
Click Confirm Plan (start with Free plan, you can upgrade later when your website pages and traffic increase).
Update Nameservers at Your Domain Registrar
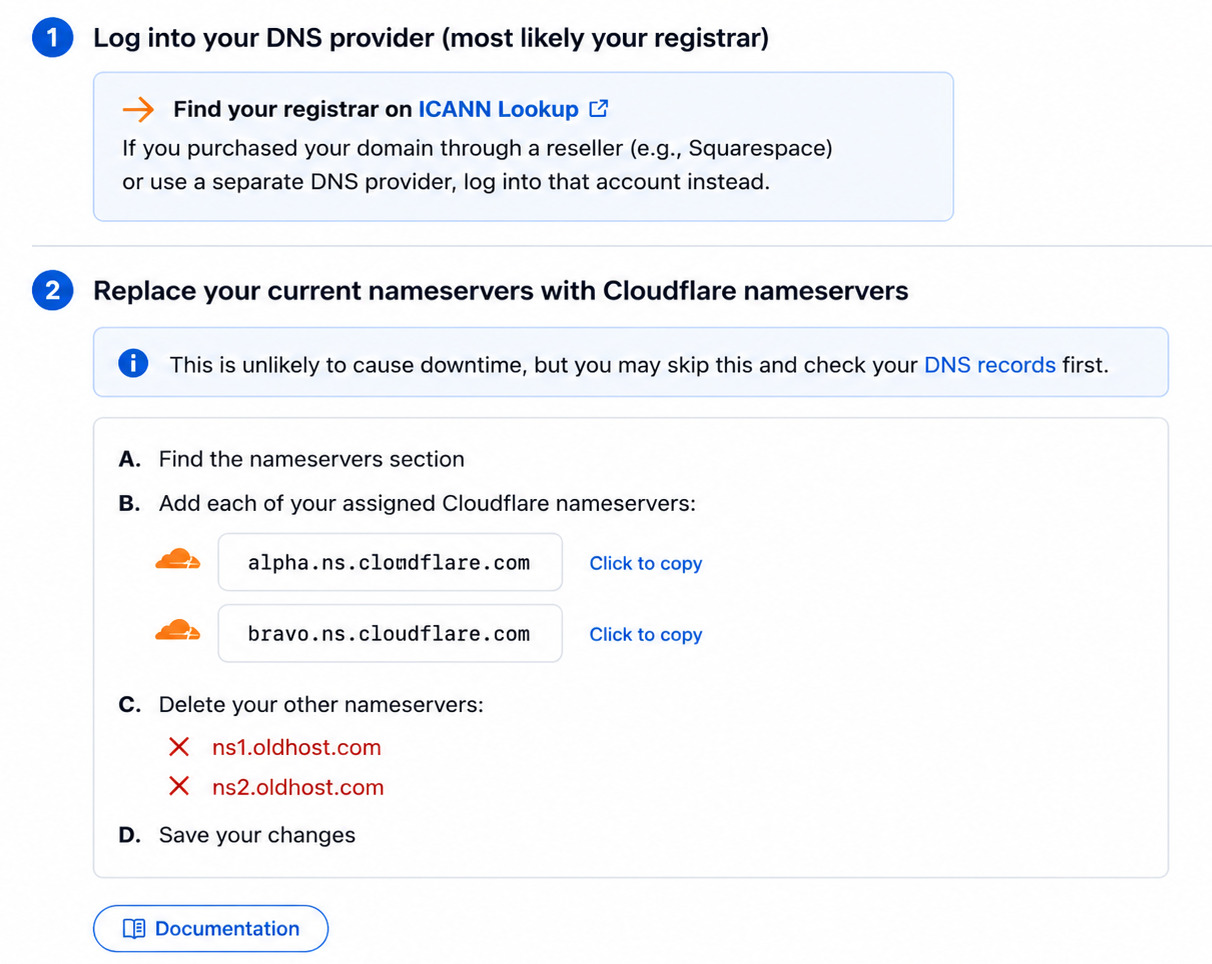
This step redirects your domain from your hosting company’s nameservers to Cloudflare’s nameservers. Without this, Cloudflare cannot work.
Get Cloudflare Nameservers
After confirming the plan, Cloudflare shows two nameservers that look like:
alpha.ns.cloudflare.com
bravo.ns.cloudflare.com
Copy them (leave this browser tab open).
Change Nameservers at Your Registrar
-
Log into your domain registrar.
-
Go to Domain Management or DNS Settings.
-
Look for Custom Nameservers or Change Nameservers.
-
Delete your hosting company’s nameservers (e.g., ns1.hostingcompany.com).
-
Paste both Cloudflare nameservers (exactly as shown).
-
Save the changes.
-
Find the domain → Manage → Nameservers → select Custom DNS → enter the two Cloudflare nameservers.
-
For Google Domains: DNS → Custom name servers → enter both → Save.
Wait for Propagation
-
DNS changes are not instant. It normally takes 5 - 30 minutes to propagate, but can take 24 to 48 hours globally.
-
You do not need to change anything on your hosting or website files - only the nameservers.
Verify Nameserver Change in Cloudflare
-
Return to Cloudflare dashboard.
-
Click on your domain.
-
Look for a banner: “Pending - Nameserver update required” or “Active”.
-
Once Cloudflare detects the nameserver change, the status becomes Active.
-
You’ll get a confirmation email from Cloudflare.
Use a free tool like DNS Checker to see if your domain’s nameservers are updated worldwide.
Configure Basic Cloudflare Settings
Now that Cloudflare is active, optimize it for speed and security.
SSL/TLS Settings
Go to SSL/TLS → Overview. Choose one of these:
-
Flexible (not recommended) - Encrypts browser-to-Cloudflare but not Cloudflare-to-your server.
-
Full (recommended for most) - Encrypts both legs. Your server must have a self-signed or shared SSL.
-
Full (Strict) - Most secure. Requires a valid SSL certificate on your hosting server.
If your website already has an SSL certificate (even Let’s Encrypt), choose Full (Strict). If not, use Full - Cloudflare will still show HTTPS in the browser.
Then enable:
-
Always Use HTTPS → ON (redirects all HTTP to HTTPS)
-
Automatic HTTPS Rewrites → ON (fixes mixed content problems)
Speed Optimizations
Go to Speed → Optimization:
-
Auto Minify → Toggle ON for JavaScript, CSS, HTML.
-
Brotli → ON (faster compression than Gzip).
-
Rocket Loader → ON (improves JavaScript loading). Test your site - if some scripts break, turn it off.
-
Mirage → OFF on Free plan, but if you have Pro, turn ON for lazy loading images.
Caching Settings
Go to Caching → Configuration:
-
Caching Level → Standard (or Aggressive if you have mostly static content).
-
Browser Cache TTL → Set to 4 hours (or 1 day for media-heavy sites).
-
Always Online → ON (Cloudflare shows a cached copy if your server goes down).
Purge Cache
Whenever you update your website design or content, click Caching → Purge Everything. This forces Cloudflare to fetch fresh files.
Add Page Rules
Cloudflare’s Free plan gives you 3 page rules. Use them to fine-tune caching.
Example rule (cache static assets longer):
-
URL: yourdomain.com/*.jpg
-
Setting: Cache Everything → Edge Cache TTL: 1 day
Another rule (never cache admin area):
-
URL: yourdomain.com/wp-admin/*
-
Setting: Cache Level → Bypass
Go to Rules → Page Rules → Create Page Rule.
Make Minor Changes on Your Website
Cloudflare works with any website - WordPress, Shopify, static HTML, etc. But some small tweaks help.
Restore Real Visitor IPs (For WordPress)
When Cloudflare proxies traffic, your website sees Cloudflare IPs instead of real visitor IPs. To fix:
If you use WordPress:
-
Install the free plugin "Cloudflare" from WordPress repository.
-
Go to Settings → Cloudflare → Enable "Restore Original Visitor IP".
Without plugin (for any backend code):
-
Cloudflare adds an HTTP header CF-Connecting-IP. Use that instead of REMOTE_ADDR.
Force HTTPS in Your Website Code
Even with Cloudflare’s "Always Use HTTPS", update your website URLs to avoid mixed content:
-
Change all internal links to HTTPS (use a tool like Better Search Replace in WordPress).
-
Update hardcoded asset URLs (images, CSS, JS) to relative paths or HTTPS.
Test Your Forms
If you have contact or login forms, test them after enabling Rocket Loader or Auto Minify. Some JavaScript-heavy forms may break - simply turn off the problematic feature.
Test Your Cloudflare CDN Installation
Run these tests to confirm everything works.
Check DNS & Proxy
Open your terminal (or Command Prompt on Windows) and type:
bash
curl -svo /dev/null https://yourdomain.com 2>&1 | grep -i "cf-ray"
If you see cf-ray in the output, Cloudflare is proxying your traffic.
Online Test Tools
-
GTmetrix or PageSpeed Insights - compare speed before and after.
-
Check if site is behind Cloudflare - use https://www.cdnplanet.com/tools/cdnfinder/
Look for Mixed Content Errors
Open your browser’s developer console (F12 → Console tab). If you see Mixed Content warnings, fix those assets by changing them to HTTPS or relative URLs.
Troubleshooting Common Problems
|
Problem |
Likely Cause |
Solution |
|
"Too many redirects" |
SSL mode mismatch |
Set Cloudflare SSL to Full and ensure your server isn't forcing HTTPS again. |
|
Email stops working |
MX records not gray (proxied) |
Edit MX records in Cloudflare → set cloud to gray. |
|
Website shows “Origin Error” |
Wrong origin IP in DNS A record |
Check that your A record points to your hosting IP (not Cloudflare’s). |
|
Images don't load after Rocket Loader |
Rocket Loader conflicts |
Turn off Rocket Loader → Speed → Optimization. |
|
Cloudflare says “Pending” for days |
Nameservers not saved at registrar |
Log into your domain registrar and re-enter both Cloudflare nameservers. |
Final Checks
-
Signed up for Cloudflare and added site
-
Corrected DNS records (A, CNAME, MX)
-
Set orange cloud for web records, gray for email
-
Changed nameservers at domain registrar
-
Waited for Active status
-
Selected SSL mode (Full or Full Strict)
-
Enabled Auto Minify & Brotli
-
Restored real visitor IPs on website
-
Tested with cf-ray header
Steps After Setup
-
Monitor analytics in Cloudflare → Analytics & Logs.
-
Set up email sending - If you use transactional email (SendGrid, Mailgun), ensure they are not proxied.
-
Add security rules - Under Security → WAF, block common threats (SQLi, XSS).
-
Create a backup of your DNS records (Cloudflare → DNS → Export).
Conclusion
Setting up Cloudflare CDN for a website is mostly about changing nameservers and toggling a few settings.
The entire process takes 30 to 60 minutes, and the free plan delivers huge speed and security benefits.
Once you’ve followed this step-by-step guide, your site will load faster, handle traffic spikes better, and stay protected from basic attacks without touching your hosting server.